Saturday morning BRUNCH is served – Peach 🍑 Dutch Baby

Caramelized Peaches within, sliced peaches on top

Peach Dutch Baby

★★★★★

Baked goods, Breakfast, Fresh Fruit

I highly recommend THE PEACH TRUCK cookbook. Every recipe I’ve tried has been a keeper 😍.

INGREDIENTS

5 tablespoons unsalted butter

1 cup chopped fresh peaches

3 large eggs

¾ cup whole milk

¾ cup all-purpose flour

4 tablespoons granulated sugar

½ teaspoon kosher salt

To Serve:

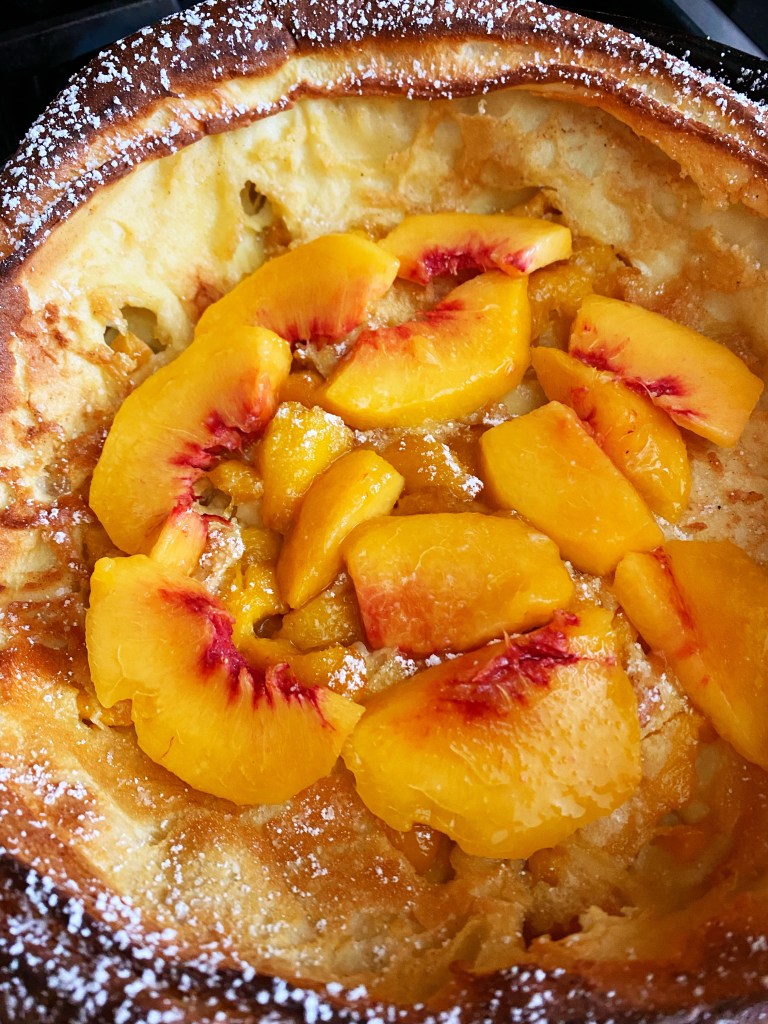
3 tablespoons powdered sugar

2 cups sliced fresh peaches

DESCRIPTION

The author’s favorite recipe from The Peach Truck cookbook

DIRECTIONS

Preheat the oven to 425 degrees F.

Melt 1 tablespoon of the butter in a 10-inch cast-iron skillet over medium-high heat. Add the chopped peaches and 1 tablespoon of the granulated sugar and cook, stirring often, until the peaches begin to brown, about 3 minutes. Remove the peaches from skillet and wipe the skillet clean. Place the skillet in the hot oven for 10 minutes.

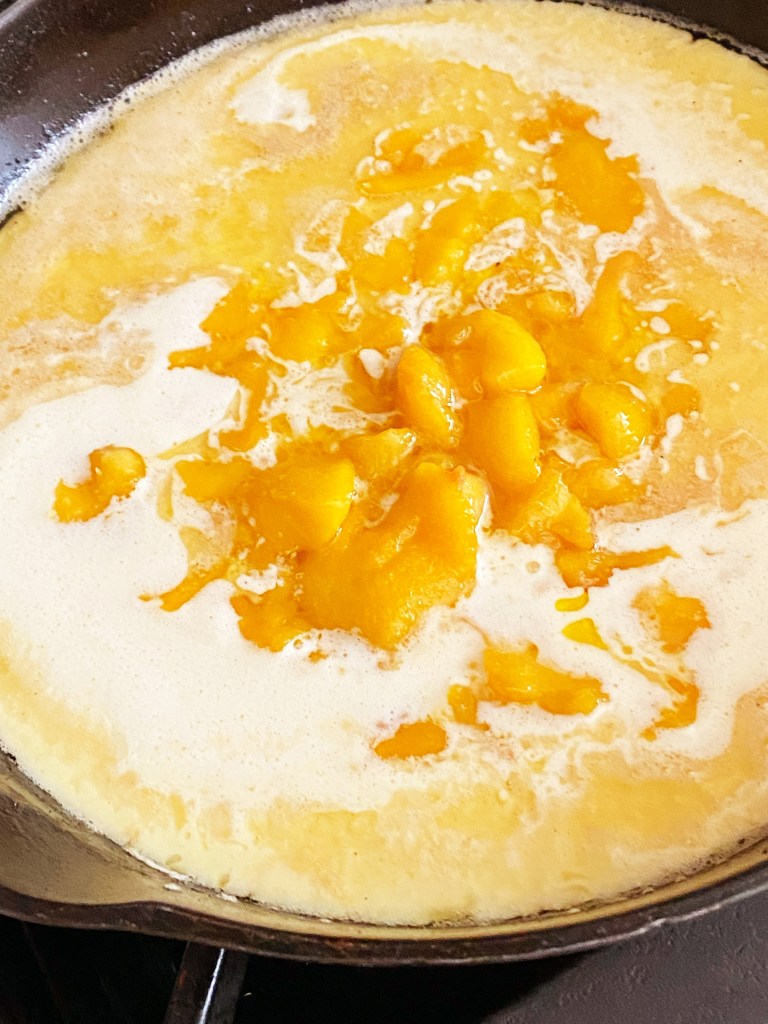
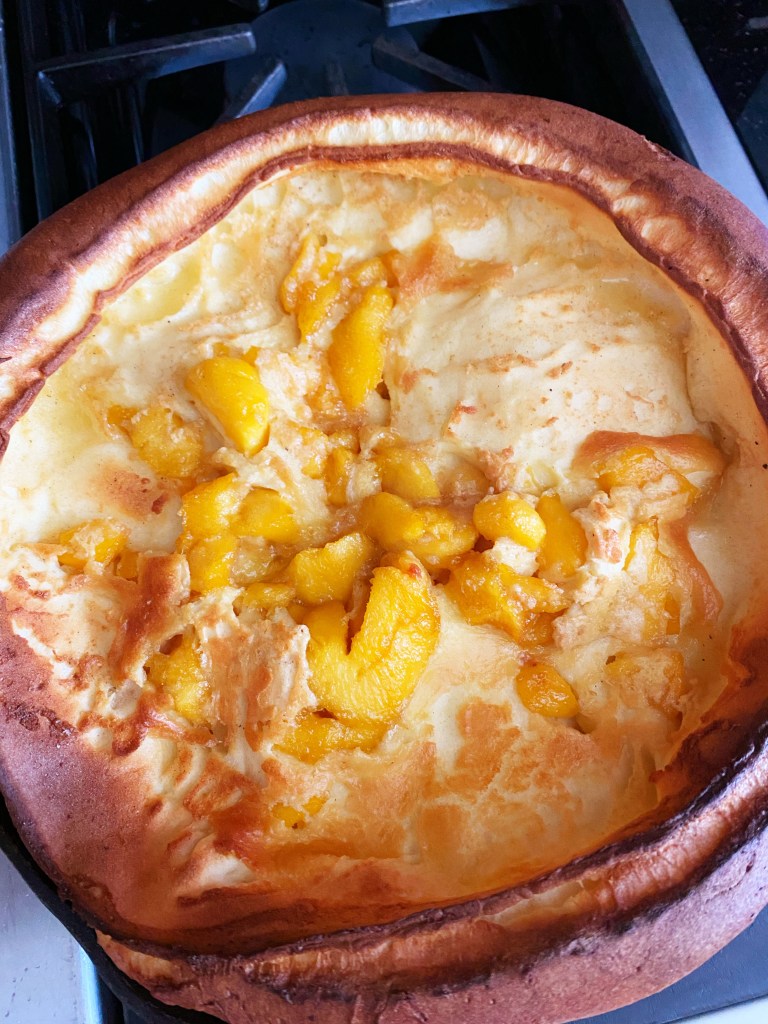
Blend the eggs, milk, flour, remaining 3 tablespoons granulated sugar, and the salt in a blender until smooth. Add the remaining 4 tablespoons butter to the skillet and swirl the skillet until the butter has melted. Pour the batter over the melted butter in the hot skillet without mixing it in. Spoon the caramelized peaches on top of the batter. Transfer the skillet to the oven and bake for 20 to 25 minutes, until puffed and golden.

Serve immediately, topped with a dusting of powdered sugar and additional sliced fresh peaches if desired.

Ready to pop back into the oven to bake
Baked and ready for the sliced fresh peaches and powdered sugar

I source my peaches from Dickey Farms as they are the only shipper that hasn’t disappointed me. Others have arrived bruised and mealy, but not if they are shipped from Dickey Farms.

French Dip in your Instapot/Pressure Cooker

Now THIS French Dip recipe for a pressure cooker is a KEEPER! It rivaled the taste and texture of a brisket recipe I make every year at Christmas (?!?!!)

Two caveats on the time. Meat must be room temp for 15 min before starting AND there’s 25 minutes to add to cook time in the natural release (steam).

I also chilled the dipping broth so the fat rose to the top for removal. I don’t find it palatable without that step.

The meat is tender as buttah and the flavor??
To-DIE-for. Never making a chuck roast another way.

Instant Pot French Dip Sandwich
★★★★★
INSTAPOT/Pressure Cooking, Kid-Friendly, Main Dish, Meats, Sandwich
Prep 15 mins ∙ Cook 1 hr 40 mins ∙ Makes Servings: 6 sandwiches ∙ Source Number-2-pencil.com
INGREDIENTS

2.5 pound chuck roast
1 tablespoon of vegetable oil
2 teaspoons of kosher salt
freshly ground pepper to taste
1/2 teaspoon of garlic powder
1 onion sliced
1/2 cup of red wine
1 14 oz can of low-sodium beef broth
1 dried bay leaf
6 soft rolls
3 tablespoons of butter melted
1/4 teaspoon of garlic powder
pinch of kosher salt
6 slices of provolone cheese
DIRECTIONS

For best results, let chuck roast rest at room temperature for at least 15 minutes before searing.

Add vegetable oil to the Instant Pot and hit the sauté button.

Season chuck roast with 2 teaspoon of kosher salt, freshly ground pepper to taste and 1/2 teaspoon of garlic powder on all side.

Using a pair on long heat-proof kitchen tongs, sear roast on all sides in Instant Pot.

Remove seared roast from Instant Pot and set aside.

Add onions to pot and sauté just until they start to soften.

Add red wine to pot and let simmer until reduced by half.

Use a wooden spoon to scrape up seared bits from the bottom of the pot as it simmers.

Once wine has reduced, add low-sodium beef broth and bay leaf.

Return roast to Instant Pot, close lid and make pressure release valve is set to sealing.

Hit Meat/Stew function and increase time to 100 minutes.

Let Instant Pot natural release for 25 minutes, then turn valve to venting to release any excess pressure.

Remove lid and transfer roast to a serving plate and shred.

Strain liquid through a fine mesh strainer and serve warm for dipping sandwiches.

Set oven to broil and place sandwich rolls on a baking sheet.

Combine melted butter, 1/4 teaspoon of garlic powder and pinch of kosher salt in a small bowl.

Brush over rolls and toast 2-3 minutes, just until gold brown.

Pile meat onto rolls and top with cheese. Return to broiler and heat just until cheese has started to melt.

Top sandwiches with freshly chopped flat-leaf parsley and serve with warm au jus for dipping.

Pickled Vegetable Sandwich Slaw

f you’re one of those people who saw the word “pickled” in the title and said “Ugh, no, sorry, not for me,” do know, I was the same not too long ago and encourage you to fight the good fight for as long as you can, because once your tastes cross over to the vinegar side, there’s little going back.

INGREDIENTS

Pickling mixture

1 cup distilled white vinegar

4 tablespoons sugar

2 tablespoons Kosher salt

2 tablespoons yellow mustard seeds

1 cup cold water

Slaw mixture

4 to 5 cups mixed slivered or julienned* firm, raw vegetables (see above for vegetable suggestions, below for slicing tips)

Optional: Few slivers of jalapeno

DIRECTIONS

Heat vinegar, sugar, salt and mustard seeds to a simmer in a small, non-reactive pot over moderate heat, stirring only until sugar and salt dissolve. Stir in water, which should bring the mixture’s temperature down significantly. Let cool to lukewarm.

Divide vegetables between jars. (I used two 3/4 liter jars.) Pour vinegar mixture over vegetables and refrigerate until needed. You’ll find the vegetables to be lightly pickled within an hour, and deliciously pickled within a day. They will get slightly more pickled as they sit, but the change shouldn’t be too dramatic from the 24 hour level.

Eat with/on sandwiches, aside grilled food and pack it along for picnics — it goes with almost anything. Then make more, because this stuff is habit-forming.

Do ahead: Mine have kept in the fridge for a month without any change in taste or appearance. Updated to add (thanks, Erika!) that you’ll want to make sure that your vegetables are submerged in the brine for them to keep this long.

* I used a mix of a sharp knife, a simple mandoline (that includes julienne blades) and a julienne peeler (the Kuhn one), which I was embarrassed to admit I bought last year until I realized how much easier it makes getting juliennes from long, thin vegetables (carrots, cucumbers, parsnips and zucchini). Don’t fret if you don’t have a fancy peeler or mandoline; you can cut thin strips with your knife, then slice them into skinny matchsticks quite easily.