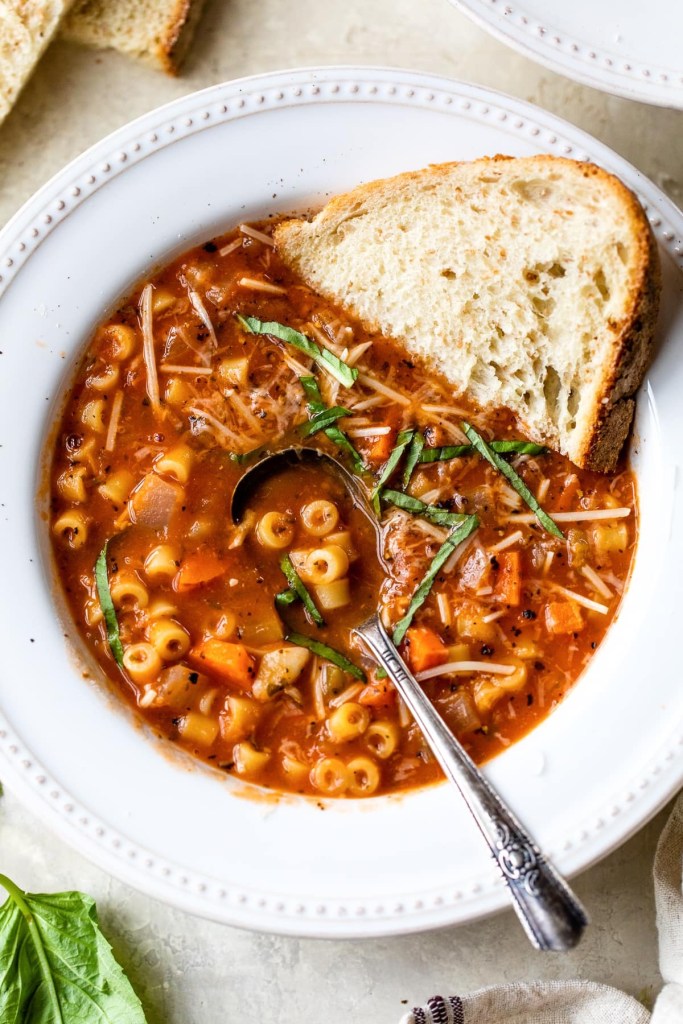
Pasta Fagioli (Pasta and Beans)


★★★★★

Healthy, Italian, Soups & Stews

Prep Time: 10 mins Cook Time: 25 mins Servings: Yield: 5 servings Source: skinnytaste.com

INGREDIENTS

1 tbsp olive oil

1/2 onion, chopped

3 cloves garlic, chopped

1 medium celery stalk, chopped

1 medium carrot, finely chopped

15 ounce can cannellini beans, not drained

15 ounce can tomato sauce or crushed tomatoes, I love Tuttorosso

1 large bay leaf

1 tbsp dried basil, or 2 tbsp fresh

1 tbsp dried parsley, or 2 tbsp fresh

1 tsp dried oregano, or 2 tbsp fresh

2 14 ounce cans chicken or vegetable broth

2 cups water

kosher salt and pepper to taste

6 oz dry Ditalini pasta or other small pasta, gf pasta for gluten-free

grated parmesan cheese for topping (optional

fresh basil, for serving

DIRECTIONS

In a large heavy pot or Dutch oven, sauté the onion and garlic in olive oil over medium heat.

Blend the beans with one cup water in electric blender until almost smooth.

Add blended beans to pan then add the can of tomato sauce, celery, carrots, chicken broth, basil, bay leaf, parsley, oregano, salt and pepper.

Add 1 cup water and bring to a boil. Simmer, covered for 20 minutes stirring occasionally.

Add pasta and cook uncovered until pasta is al dente, according to pasta directions.

Ladle soup into bowls and top with grated cheese (extra), if desired.

NOTES

If you want to make this more of a bean soup and omit the pasta, add another can of whole beans and omit the pasta.

Meal Prep Tip: Cook the pasta separate if you want to make this ahead. If you refrigerate with the pasta, it will soak up the liquid.

NUTRITION

Serving: 1 1/2 cups, Calories: 262.5 kcal, Carbohydrates: 46 g, Protein: 10 g, Fat: 4 g, Saturated Fat: 0.5 g, Cholesterol: 46 mg, Sodium: 623 mg, Fiber: 5.5 g, Sugar: 6 g

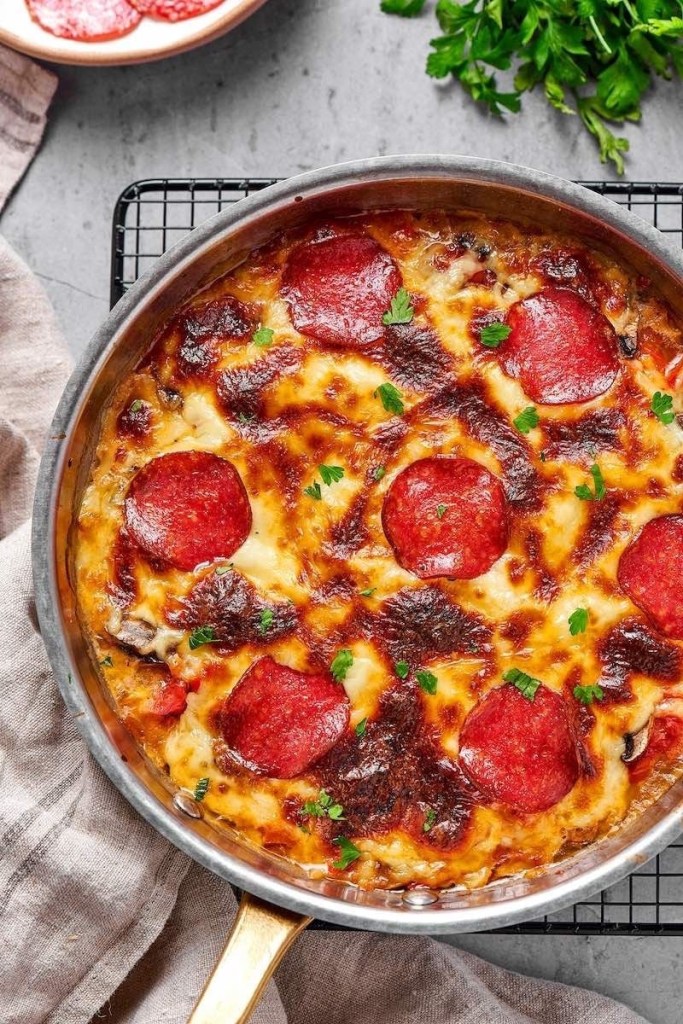
Crustless Pizza 🍕

This crustless pizza the ultimate low carb comfort that has all the best parts of a pizza, minus the crust! Cheesy, meaty, and easy to customize, it’s made in just ONE skillet and takes 15 minutes to make.

Crustless Pizza

Italian, Pizza 🍕

Cook Time: 10 mins Source: thebigmansworld.com

INGREDIENTS

1/2 lb lean ground turkey (substituting ground beef works)

1 tablespoon olive oil

1 clove garlic minced

1 tablespoon Italian seasonings

1 cup cheddar cheese grated

1/2 cup keto pizza sauce

4 small mushrooms chopped

1/4 cup olives slices

8 slices pepperoni

1/2 cup mozzarella cheese grated

DIRECTIONS

Start by adding your olive oil into a 12-inch skillet and placing it over medium heat. Once hot, add the garlic and cook until fragrant. Add the ground turkey and use a spatula to break it apart. Cook the ground turkey for 5-6 minutes, until it is no longer pink.

Next, remove the skillet from the heat. Stir through the cheddar cheese and mix until fully incorporated and form the base of the ‘pizza’. Add the pizza sauce, followed by the pizza toppings, then add the mozzarella cheese on top.

Now, bake the crustless pizza for 12-15 minutes, or until the cheese is bubbling on top. Remove the pizza from the oven before slicing and serving it.

Preheat the oven to 200C/400F.

Add the olive oil to a skillet and place it over medium heat. Once hot, add the garlic and cook for a minute. Add the ground turkey and break apart using a rubber spatula. Cook for 4-5 minutes, until no longer pink. Stir through the Italian seasonings.

Remove the skillet off the heat. Stir through the cheddar cheese. Spread the pizza sauce on top, followed by the mushrooms, olives, and pepperoni. Top with the mozzarella cheese.

Place the skillet in the oven and bake the crustless pizza for 10-15 minutes, or until the cheese is bubbly and golden.

Remove the skillet from the oven and slice into four portions and serve immediately.

NUTRITION

Calories: 282kcal
Carbohydrates: 3g
Protein: 25g
Fat: 19g
Sodium: 494mg
Potassium: 272mg
Fiber: 2g
Vitamin A: 419IU
Vitamin C: 1mg
Calcium: 342mg
Iron: 1mg
NET CARBS: 1g

Apple 🍎 Cider Baked Doughnuts with Maple Glaze

Prep Time: 15 mins Cook Time: 15 to 18 mins Servings: 12 doughnuts Source: kingarthurbaking.com

INGREDIENTS

Doughnuts

1/3 cup (67g) vegetable oil

3 large eggs

1 1/4 cups (248g) granulated sugar

1 cup (255g) applesauce, unsweetened preferred

1/4 cup (85g) boiled cider, or 6 tablespoons (85g) additional applesauce

1 1/2 teaspoons King Arthur Pure Vanilla Extract

1 teaspoon cinnamon

1 teaspoon salt

1 1/2 teaspoons baking powder

2 cups (240g) King Arthur Unbleached All-Purpose Flour

2 tablespoons (25g) cinnamon sugar

Maple glaze

1 1/2 cups (170g) confectioners’ sugar

3 tablespoons (64g) maple syrup*

3/4 teaspoon maple flavor, optional; for enhanced flavor

pinch of salt

2 teaspoons milk or 1 tablespoon heavy cream, enough to make a spreadable glaze

DIRECTIONS

Preheat the oven to 350°F. Lightly grease two standard doughnut pans. If you don’t have doughnut pans, you can bake these in a standard muffin tin; they just won’t be doughnuts.

Beat together the oil, eggs, sugar, applesauce, boiled cider, vanilla, cinnamon, salt, and baking powder until smooth.

Add the flour, stirring just until smooth.

Fill the wells of the doughnut pans nearly to the rim; use about 1/4 cup of batter in each well. If you’re making muffins, fill each well about 3/4 full; the recipe makes about 15, so you’ll need to bake in two batches (unless you have two muffin pans).

Bake the doughnuts for 15 to 18 minutes, or until a cake tester inserted into the center of one comes out clean. If you’re making muffins, they’ll need to bake for 23 to 25 minutes.

Remove the doughnuts from the oven, and loosen their edges. After about 5 minutes, transfer them to a rack.

While the doughnuts are still warm (but no longer fragile), gently shake them, 1 or 2 at a time, in a bag with the cinnamon sugar. If you’ve made muffins, sprinkle their tops with sugar. Allow the doughnuts or muffins to cool completely before glazing.

To make the glaze: Mix together all of the glaze ingredients, stirring until smooth.

Spread the doughnuts with glaze (or dip tops in glaze); return to the rack until the glaze is set.

Tips from our Bakers

To make apple cider glaze: Follow the maple glaze instructions, substituting boiled cider for the maple syrup, increasing the sugar by 1/4 cup, and omitting the maple flavor.

Don’t forget to share 😎

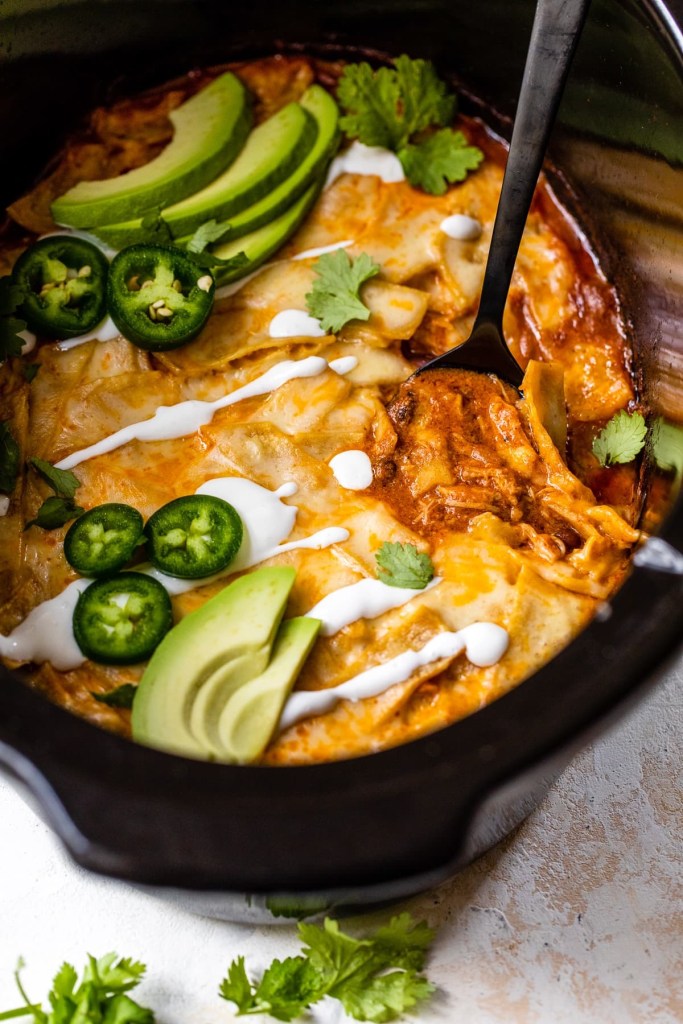
Slow Cooker Chicken Enchiladas

Slow Cooker Chicken Enchilada Casserole

Crock Pot/Slow Cooker, Make Ahead, Mexican

Prep Time: 15 mins Cook Time: 4 hrs 30 mins Servings: Yield: 6 servingsSource: skinnytaste.com

INGREDIENTS

1 lb boneless skinless chicken thighs , or chicken breast

1 teaspoon avocado oil , or olive oil

1/2 medium onion, chopped

2 garlic cloves, finely chopped

1 teaspoon ground cumin

1 teaspoon kosher salt

2 cups homemade enchilada sauce, or 16 ounce jarred

1/4 cup sour cream, plus more for serving

4 corn tortillas, cut into strips

15 ounce can low-sodium black beans, rinsed and drained

4 ounces shredded cheese, such as a Mexican cheese blend, Monterey Jack, or mozzarella (about 1 cup)

sliced jalapeño peppers , and chopped fresh cilantro, for topping

optional for topping and serving:

sliced avocado

crema or sour cream

cilantro lime rice

DIRECTIONS

Heat the oil in a skillet over medium heat. Add the onion, garlic, cumin, and salt and cook, stirring, until the onion has softened and browned, about 5 minutes.

Transfer to the slow cooker and add the enchilada sauce, sour cream, and 1/4 cup water to the onion mixture and stir to combine. Fold in the beans until thoroughly coated.

Nestle the chicken in.

Cover and cook on high for about 3 to 4 hours or high low for about 6 to 7, until chicken is tender and cooked through. Shred the chicken in the pot with 2 forks.

Add the tortilla strips and stir, then top with the cheese, cover the slow cooker, and cook 30 minutes or until the cheese has melted.

Once the cheese is melted, garnish with cilantro, jalapenos, and optional toppings.

Serve over rice if desired and top with optional sour cream, and avocado.

NOTES

If using chicken breast, the WW Points are 5 pts instead of 7.

Refrigerated for 4 days in an airtight container. You can also freeze it for up to 3 months and reheat it in the microwave.

To make this in the pressure cooker or Instant Pot: follow steps 1 to 4, cook high pressure 20 minutes, natural release. Shred chicken, add tortillas, stir in. Top with cheese and cook high pressure 5 to 10 minutes, quick release.

NUTRITION

7 Cals: 315 Protein: 25.5 Carbs: 26 Fats: 12
Serving: 1 cup, Calories: 315 kcal, Carbohydrates: 26 g, Protein: 25.5 g, Fat: 12 g, Saturated Fat: 5 g, Cholesterol: 92.5 mg, Sodium: 862 mg, Fiber: 7 g, Sugar: 3.5 g

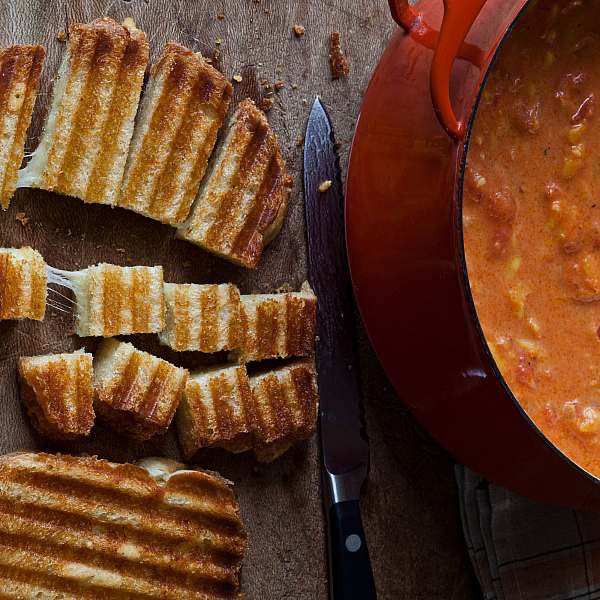
Easy Tomato Soup & Grilled Cheese Croutons

By Ina Garten

SERVES 4 TO 6

Ingredients

  • 3 tablespoons good olive oil
  • 3 cups yellow onions, chopped (2 onions)
  • 1 tablespoon minced garlic (3 cloves)
  • 4 cups chicken stock, preferably homemade
  • 1 (28-ounce) can crushed tomatoes, preferably San Marzano
  • Large pinch of saffron threads
  • Kosher salt and freshly ground black pepper
  • 1/2 cup orzo
  • 1/2 cup heavy cream
  • Grilled Cheese Croutons (recipe below)

Directions

In a large pot or Dutch oven such as Le Creuset, heat the olive oil over medium heat. Add the onions and cook over medium-low heat for 15 minutes, stirring occasionally, until golden brown. Add the garlic and cook for 1 more minute. Stir in the chicken stock, tomatoes, saffron, 1 tablespoon salt, and 1 teaspoon pepper. Bring the soup to a boil, then lower the heat and simmer for 15 minutes.

Meanwhile, fill a medium pot with water, add 2 teaspoons salt, and bring to a boil. Add the orzo and cook for 7 minutes. (It will -finish cooking in the soup.) Drain the orzo and add it to the soup. Stir in the cream, return the soup to a simmer, and cook for 10 more minutes, stirring frequently.

Serve hot with Grilled Cheese Croutons scattered on top.

Grilled Cheese Croutons (Serves 4 to 6)

  • 4 (½-inch-thick) slices country white bread
  • 2 tablespoons unsalted butter, melted
  • 4 ounces Gruyère cheese, grated

Heat a panini grill. Place the four slices of bread on a cutting board and brush lightly with the melted butter, being sure to butter the corners. Turn the slices over and pile Gruyère on two of the slices. Place the remaining two slices of bread on top of the Gruyère, -buttered sides up.

Grill the sandwiches on the panini grill for about 5 minutes, until nicely browned. Place on a cutting board, allow to rest for 1 minute, and cut into 1-inch cubes.

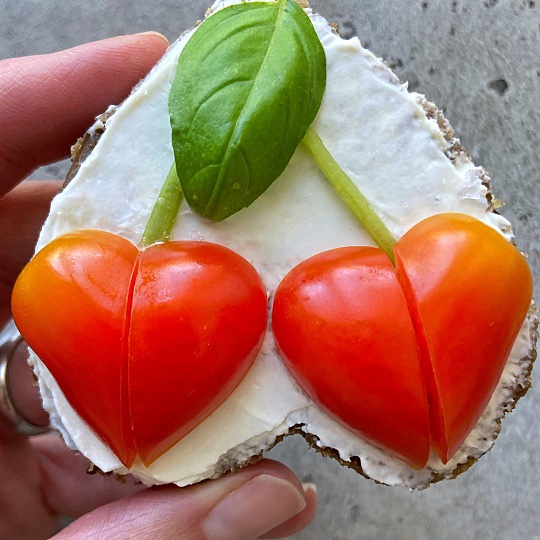
Cherry 🍒 Tomatoes on Rye

Appetizer, Entertaining for a crowd, Make Ahead

Prep Time: 20 minutes Source: foodbites.dk

INGREDIENTS

grape tomatoes

cream cheese

rye bread

basil stems

basil leaves

heart-shaped cookie-cutter

DIRECTIONS

1. Use the heart cutter to shape the bread.

2. Top the bread with cream cheese.

3. Halve the grape tomatoes at a slant.

4. Slice each half through the middle.

5. Turn the two sets of halves around and match them together to resemble hearts.

6. Place the hearts on the broadest part of the bread.

7. Use basil stems for the cherry stems and top with a basil leaf.

8. Sprinkle some sea salt on top, and enjoy.

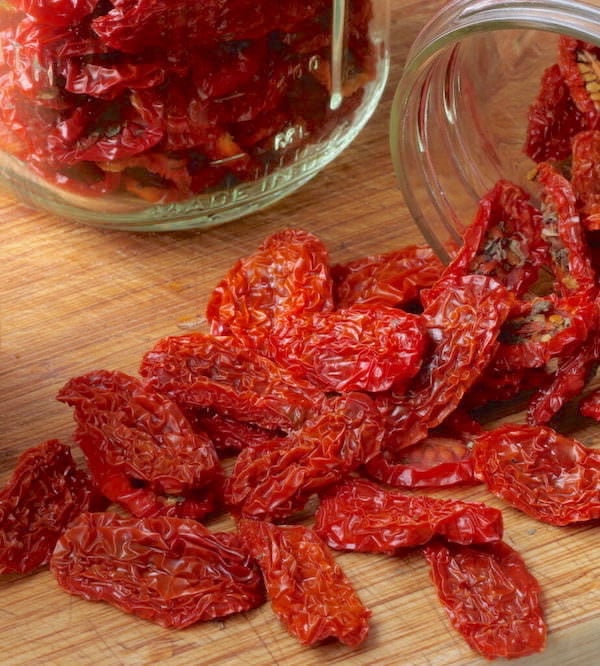
Everything You Need to Know About Dehydrating Cherry or Grape Tomatoes 🍅

A sprinkle with oregano & sea salt is optional

If you’re like me, you only eat fresh grape and cherry tomatoes when they’re in-season, vine ripened, and just picked. Compare the bright flavor of summertime tomatoes to the anemic taste of off-season hothouse tomatoes and there’s no contest! Want to preserve their incredible taste? Consider dehydrating them!

Dehydrating grape and cherry tomatoes creates an intense burst of flavor and color. If you grow your own garden I suggest planting extra grape tomatoes and/or cherries just for this purpose. If you don’t have your own bumper crop, see if a local farm or market will sell you them in quantity at a discount.

Dehydrating Grape and Cherry Tomatoes

“Moist-Dry” versus “Leathery-Dry”

I prefer dehydrating grape and cherry tomatoes until they are almost dry; I store these moist gems in the freezer. Dry completely if you prefer to store them in your pantry, otherwise they’ll grow mold.

Drying Tomatoes in a Dehydrator

Method Overview

Wash grape or cherry tomatoes
Cut them in half
Arrange on trays
Dehydrate between 125ºF – 135ºF
Check and rotate trays periodically

Wash the tomatoes and drain well.

Slice each tomato in half lengthwise.

Arrange the halved tomatoes on your dehydrator trays with the skins facing down. This will prevent the juices from dripping. Leave a bit of space between each tomato so they are not touching. Sprinkle with oregano and sea salt if desired.

Put the trays in your dehydrator and turn it on. If it has a thermostat, set it between 125º to 135º.

It will take 10 to 12 hours for the tomatoes to become “moist dry” and will take 12 to 14 hours to become “leathery dry.” These are approximate times. Periodically check the tomatoes for doneness, and rotate the trays. Even if your dehydrator has a fan, rotating the trays will help them become more evenly dried.

Once dried to your preference, let the tomatoes cool down. Place them in an airtight glass jar with a screw lid; label with the date.

Leave the jar at room temperature for 24 hours so the moisture content of the tomatoes will become more evenly distributed. This process is called “conditioning”.

Store moist-dry tomatoes in the freezer. Store leathery-dry tomatoes in a cool, dark, dry location.

Hard to eat just one so resist if you can!

FAQs

How long does it take to dehydrate grape and cherry tomatoes?
In general, it takes somewhere between 10 to 14 hours for halved grape and cherry tomatoes to dehydrate. The actual time will depend on several factors, such as:
• temperature of the dehydrator
• humidity in the room
• whether the dehydrator has a circulating fan or not to keep the heat evenly distributed
• how often the dehydrator is opened, and if it opens from the top or side
• size and moisture content of the tomatoes
• whether you are drying until moist-dry or leathery-dry

How to use dried tomatoes?
• We enjoy eating moist-dried tomatoes right out of the jar for a burst-of-tomato snack. We also add them to various salads, wraps, stuffings, and more. Many Italian recipes call for sautéing garlic in olive oil. Consider slicing moist-dried tomatoes into ribbons, then adding them to the pan during that step. They are especially delicious in hot or cold pasta dishes that call for a pesto or olive oil dressing. Even just a bit of these gems adds a welcome bursts of flavor – there’s no need to overdo it.
• Soak leathery-dried tomatoes in a small amount of warm water until they are softened. Once they’re softened, slice into ribbons (or use as is) in various dishes as described above. You can add the tomato infused soaking water to your dish too.

How long do dehydrated tomatoes last?
Technically, if kept in an airtight container, moist-dry tomatoes will last indefinitely in the freezer and leathery-dry tomatoes will last indefinitely in a dark, dry, cool location. The longer they are stored; however, the more nutrients will be lost. So try to use them within a year.

How to make tomato powder and what is it used for?

If you have a grinder or a high speed blender, tomato powder can be made from leathery-dried tomatoes following these three easy steps.

Freeze leathery-dried tomatoes before grinding or blending them into powder.
Transfer them to your grinder or high-speed blender and immediately process using the highest speed. Blend while the tomatoes are still frozen for best results. They thaw fast, so work quickly.
Put the powder into a glass jar with a tight fitting lid and store in a dark, dry, cool location.
As you can imagine, tomato powder packs a tomato punch. It can be added to soups, sprinkled on anemic tomatoes (to boost their flavor), sauces, and more.

You can also use this powder to make tomato paste. Simply combine two parts powder to one part water and voila, you have tomato paste!

Summer Tomato Sandwich

When garden tomatoes are at their juiciest, this classic eat-it-over-the-sink sandwich—with its mayo-gilded drips—is a must.

★★★★★

Sandwich, TRIED & TRUE

Prep Time: 5 mins Cook Time: 5 mins Servings: Source: southernliving.com

INGREDIENTS

2 (1/2-inch-thick) slices beefsteak tomato

1/4 tsp. kosher salt or 1/8 tsp. table salt

1/4 tsp. freshly, coarsely ground black pepper

2 slices white sandwich bread

3 Tbsp. mayonnaise (homemade or Dukes)

DIRECTIONS

Prepare tomato slices:

Arrange tomato slices on a paper towel; sprinkle evenly with salt and pepper. Let stand until tops of slices are beaded up with juices, 3 to 5 minutes.

Spread one side of each bread slice with 1 1/2 tablespoons mayonnaise.

Arrange tomato slices on mayo side of one bread slice; top with other bread slice, mayo slice down. Enjoy immediately.

It’s probably safe to say that most Southerners with tomatoes in their garden (or with generous friends who grow tomatoes) mark the official beginning of summer with their first tomato sandwich. It’s a delicious kickoff to a season of produce goodness, a ritual enjoyed often and with great enthusiasm while tomatoes are at their peak. It’s one of the simplest sandwiches you can make, and to enjoy a true taste of summer in the South, you really do need to keep it simple.

Of course, there are embellishments you can add if you want (more about that later), but the basic formula of soft white bread, mayonnaise, tomatoes, salt, and pepper produces a Southern ideal. The bread soaks up the yummy tomato juices, which mingle with the creamy mayo, but it doesn’t get soggy because you eat this yumminess right away, and quickly. The tomato sandwich is so irresistible, you might just gobble down two in a row. It’s shockingly easy to do.

What Kind of Tomato Is Best for a Tomato Sandwich? 

The most important thing for a good tomato sandwich is that you start with a fresh beefsteak tomato from the garden or the farmers’ market. You’re not going to get the same sort of intense joy from a grocery store tomato, which typically lacks the same level of juiciness, sweetness, and flavor complexity.

Beefsteak tomatoes are the big guys, the ones you might sometimes call slicer tomatoes; a slice of this kind of tomato should cover a piece of sandwich bread or a hamburger bun. You can go with heirloom or conventional tomatoes; either type will be delicious.

What Kind of Bread Is Best for a Tomato Sandwich? 

Soft white bread is what you want here. Baguettes and artisanal boules are beautiful loaves, and whole-grain bread is downright delicious, but they’re not right for this a tomato sandwich. Squishy white bread from the bread aisle, not the bakery section, is the right choice. The softness marries perfectly with the juicy-meaty texture of the tomatoes, so preferably leave the bread untoasted.

Note that some white sandwich bread is very sweet (from lots of added sugar), so for the best flavor—bread that truly complements the tomatoes—look for brands such as Sara Lee, which contains just two grams of added sugar per serving.

What Is the Best Mayonnaise for a Tomato Sandwich? 

If you really want to go for the most luxe, top-notch experience, try making your own homemade Mayo. (It’s easier than you think, and it tastes fantastic.) Short of that, Duke’s gets the gold star for its supreme creaminess and balanced flavor with a hint of tang and loads of savory richness.

Our Top Tip for the Best Southern Tomato Sandwich 

With something this simple, quality ingredients are of course key. We’ve already discussed those crucial garden tomatoes, the best bread, and the right mayo. To make all of those elements come together in perfect harmony, you need to season the tomatoes to enhance their flavor and juiciness.

We recommend placing the slices on a paper towel, sprinkling with generous amounts of kosher salt and coarsely ground black pepper, and letting them hang out for 3 to 5 minutes. Some of the juices will soak into the paper towel, but don’t worry—there will still be plenty to run down to your elbow as you take a bite. That brief hang time allows the seasonings to permeate the tomato (making it taste like tomato to the 10th degree) and really gets the juices going.

Possible Embellishments for a Tomato Sandwich 

Trust us: The simple tomato sandwich recipe below is a thing of beauty, the sandwich you’ll crave all your life.

If you want a little more oomph, however, you can try adding some very thinly sliced Vidalia onion for crunch and additional savory notes. You can even soak that shaved onion in cider vinegar for a minute for a puckery pickled onion effect. Or chop some basil and stir it into your mayo for an herbal punch.

In place of kosher salt, you could try smoked salt, seasoned salt, or garlic salt, and you could replace the black pepper with crushed red pepper flakes.

Hawaiian Bread from your Bread Machine

Bread Machine Hawaiian Bread

Bread Machine, BREAD MAKER, Breads
Prep Time: 2 hrs 45 mins | Cook Time: 12 mins | Servings: Servings 20 rolls

Ingredients:
⅓ cup pineapple juice – 76 gr (or water or milk)
½ cup mashed potatoes – 125 gr
2 tablespoons nonfat dried milk powder – 14 gr (or use milk instead of pineapple juice and leave the milk powder out)
1 large egg – 50 gr
1 egg yolk – 14 gr
3 tablespoons sugar – 36 gr
⅓ cup heavy cream – (80 gr)
¼ cup butter – chopped (57 gr)
1 tablespoon honey – 21 gr
1 teaspoon salt – 6 gr
¼ teaspoon ground ginger
½ teaspoon cake batter-extract – 2.5 gr
3 cups unbleached all-purpose flour – 360 gr
2 teaspoons bread machine yeast – 6 gr
Glaze
1 egg yolk – 14 gr
1 tablespoon milk – 14 gr

Directions:
Making the dough:
Combine all of the dough ingredients into the bread machine pan in the order given. Select the DOUGH cycle and push the START button.


Open the lid after a minute and check to ensure the paddles are engaged and working correctly. The dough should start to clump.


If the dough looks like pancake batter or is dry and crumbly, you may have inadvertently mismeasured an ingredient, or perhaps there is a mistake in the recipe. Add flour, one tablespoon at a time, if the dough is too wet, or liquid if the dough is too dry (wait a couple of minutes between each addition).
Recheck your dough again after 15-18 minutes. The dough should stick to the sides, then pull away cleanly. See the video to watch this in action. Note how shiny and elastic the dough is.


When the dough cycle completes and the dough has risen to double, remove dough from the bread machine pan to a floured surface. (I use a silicone mat so I can throw it in the dishwasher.)
Shaping the dough for rolls:
Spray two 7 or 8-inch, square or round pans with an aerosol oil/flour mixture like Baker’s Joy.
Form dough into a large ball. Divide in half. Divide each half into 10 portions and form each portion into a ball.
Place 10 balls into each pan. Cover pans with a tea towel and find a warm place for the rolls to rise again.
About 15 minutes before rolls are ready to bake, preheat oven to 375 degrees.
Let dough balls rise until about half again their original size. If you let them get too big during this rising, they will be dry.
Glaze
Whisk egg yolk and milk together in a small bowl. Use a silicone brush to carefully coat unbaked rolls (don’t let it drip) before you place them into the oven.
Baking Rolls
Place rack in a low position in your oven. Bake rolls at 375˚F for 13-15 minutes or until golden brown. You don’t want them to be doughy, but if you bake them too long, they will be dry and lose the soft texture you expect in Hawaiian bread.
After cooling an hour or two, place rolls into a plastic bag to keep the crust soft.

Notes:
Variation:

  1. Knead a cup of raisins or other dried fruit into the bread dough after removing it from the bread machine for a fabulous variation.
  2. If you want a round loaf, divide the dough into three parts. Use two parts to make a round loaf. The remaining dough is good for rolls. In case you’re wondering why not make a bigger loaf with all the dough: My experience says it’s difficult to get a whole loaf of that size to bake all the way through without drying out the loaf on the edges.
    Directions for making bread with a stand mixer or by hand:
    To make this recipe in a heavy-duty stand mixer: Add ingredients to the bowl in the same order.
  3. Turn on LOW to mix until all ingredients are moistened. Then, using a dough hook, turn the speed to 2 or 3. Continue beating/kneading until dough becomes smooth and elastic (about 5-10 minutes). Cover and allow to rise in a warm place. Deflate dough gently and shape as indicated in the recipe.

  4. If making by hand: Combine all ingredients into a shaggy ball in a large bowl. Turn dough out onto a floured surface. Knead with your hands until the dough becomes smooth and elastic. Kneading will likely take 10-20 minutes, depending on your experience. Place the dough ball into a greased bowl. Cover and allow to rise until double. Deflate the dough gently and shape as indicated in the recipe.
    Please note: If you only have active dry yeast, use 1/4 teaspoon more than called for in the recipe. It no longer needs to be dissolved first, but you can if you prefer.

Nutrition:
Calories 133 kcal
Serving: 1roll | Calories: 133kcal | Carbohydrates: 20g | Protein: 3g | Fat: 5g | Saturated Fat: 3g | Polyunsaturated Fat: 1g | Monounsaturated Fat: 1g | Trans Fat: 1g | Cholesterol: 30mg | Sodium: 148mg | Potassium: 75mg | Fiber: 1g | Sugar: 4g | Vitamin A: 171IU | Vitamin C: 2mg | Calcium: 19mg | Iron: 1mg

Source: https://saladinajar.com/recipes/sweet-hawaiian-style-rolls-mixed-in-a-bread-machine/#comments

Chinese Chicken Salad 🥗

Chinese Chicken Salad

CHINESE CHICKEN SALAD

prep: 25 MINUTES

total: 25 MINUTES

Made with leftover rotisserie chicken, romaine, napa, crispy wonton strips and the best sesame ginger dressing ever!

4.8 stars (12 ratings)

INGREDIENTS

  • 1 head romaine, shredded
  • 4 cups shredded napa cabbage
  • 3 cups leftover shredded rotisserie chicken
  • 1 (15-ounce) can mandarin oranges, drained
  • ½ cup chopped fresh cilantro leaves
  • ½ cup roasted salted cashews
  • 3 green onions, thinly sliced
  • 2 cups crispy wonton strips, homemade or store-bought
  • 2 teaspoons toasted sesame seeds

FOR THE SESAME GINGER DRESSING

  • ¼ cup rice vinegar
  • 3 tablespoons orange marmalade
  • 2 ½ tablespoons canola oil
  • 2 ½ tablespoons toasted sesame oil
  • 1 tablespoon reduced sodium soy sauce
  • 2 teaspoons freshly grated ginger
  • 2 teaspoons toasted sesame seeds
  • Kosher salt and freshly ground black pepper, to taste

INSTRUCTIONS

  • To assemble the salad, place romaine lettuce in a large bowl; top with cabbage, chicken, mandarin oranges, cilantro, cashews and green onions. Pour the sesame ginger dressing on top of the salad and gently toss to combine.
  • Serve immediately, topped with wonton strips and sesame seeds.

FOR THE SESAME GINGER DRESSING

  • In a small bowl, whisk together rice vinegar, orange marmalade, canola oil, sesame oil, soy sauce, ginger and sesame seeds; season with salt and pepper, to taste.