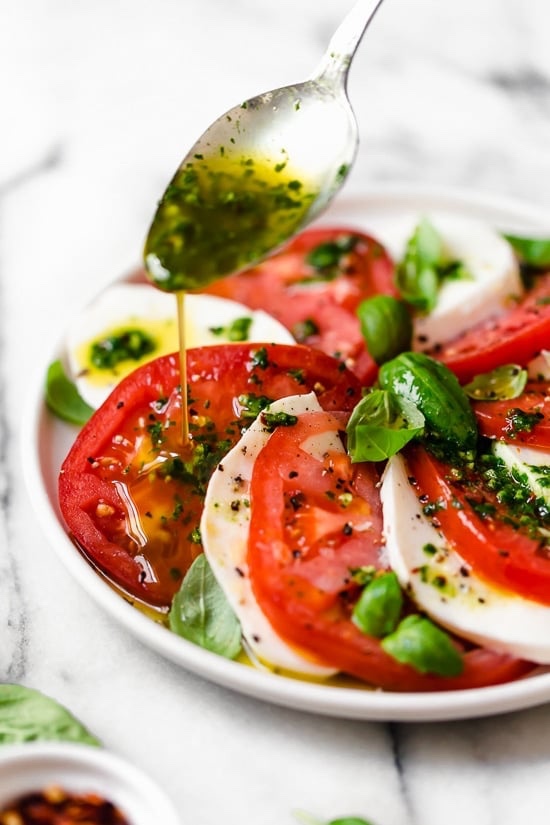
1/2 cup packed fresh basil leaves, stemmed and washed
1/4 cup DeLallo extra virgin olive oil
1 tablespoon water
2 cloves garlic
1/2 teaspoon kosher salt
1/8 teaspoon crushed red pepper flakes
DIRECTIONS
Place the basil, water, garlic, salt and red pepper flakes in a mini-food processor and pulse a few times. Add the olive oil and blend until you have smooth sauce.
Use immediately or refrigerate. Flavors are even more intense the next day. Refrigerate for up to 2 to 3 days.
★★★★★ Quick & Easy, Summer, TRIED & TRUE, Vegetable Prep Time: 10 min Cook Time: 10 min Difficulty: Easy Servings: Yield: 6 to 8 servings Source: foodnetwork.com INGREDIENTS
8 to 10 ears of corn on the cob (yellow or white corn) 3 tablespoons unsalted butter 1 teaspoon kosher salt 1/4 teaspoon freshly ground black pepper DIRECTIONS
Remove the husks and the silk from the corn and cut the kernels off as close to the husk as possible without removing any of the husk. You should have about 7 cups of kernels.
Melt the butter in a large, heavy saute pan. Add the corn, salt, and pepper and saute uncovered on medium-low heat for 8 to 10 minutes, stirring occasionally, until all the starchiness in the corn is gone. Taste, for salt and pepper, and serve.
NOTES
The older the corn, the starchier it becomes. When I’ve had corn from the farmer’s market in my fridge for a few days, I make this recipe. As Ina says in the recipe, 8 to 10 minutes over medium low heat cooks off the starch, leaving only sweetness. It’s fantastic.
Trim the pork tenderloin of any excess fat/silver skin. Coat with a ½ tablespoon olive oil. Rub spice mixture on entire pork tenderloin.
Preheat air fryer to 400° F for 5 minutes. After 5 minutes, carefully place pork tenderloin into air fryer and air fry at 400° F for 20-22 minutes. Internal temp should be 145°F.
When air fryer cycle is complete, carefully remove pork tenderloin to a cutting board and let rest for 5 minutes before slicing. Save any juices to serve over sliced meat.
4 Ingredient Frozen Peach Lemonade 🍑🍋 The most refreshing drink to enjoy poolside or after a hot day in the sun. I love making fun lemonades in the summer.
This crustless pizza the ultimate low carb comfort that has all the best parts of a pizza, minus the crust! Cheesy, meaty, and easy to customize, it’s made in just ONE skillet and takes 15 minutes to make.
Start by adding your olive oil into a 12-inch skillet and placing it over medium heat. Once hot, add the garlic and cook until fragrant. Add the ground turkey and use a spatula to break it apart. Cook the ground turkey for 5-6 minutes, until it is no longer pink.
Next, remove the skillet from the heat. Stir through the cheddar cheese and mix until fully incorporated and form the base of the ‘pizza’. Add the pizza sauce, followed by the pizza toppings, then add the mozzarella cheese on top.
Now, bake the crustless pizza for 12-15 minutes, or until the cheese is bubbling on top. Remove the pizza from the oven before slicing and serving it.
Preheat the oven to 200C/400F.
Add the olive oil to a skillet and place it over medium heat. Once hot, add the garlic and cook for a minute. Add the ground turkey and break apart using a rubber spatula. Cook for 4-5 minutes, until no longer pink. Stir through the Italian seasonings.
Remove the skillet off the heat. Stir through the cheddar cheese. Spread the pizza sauce on top, followed by the mushrooms, olives, and pepperoni. Top with the mozzarella cheese.
Place the skillet in the oven and bake the crustless pizza for 10-15 minutes, or until the cheese is bubbly and golden.
Remove the skillet from the oven and slice into four portions and serve immediately.
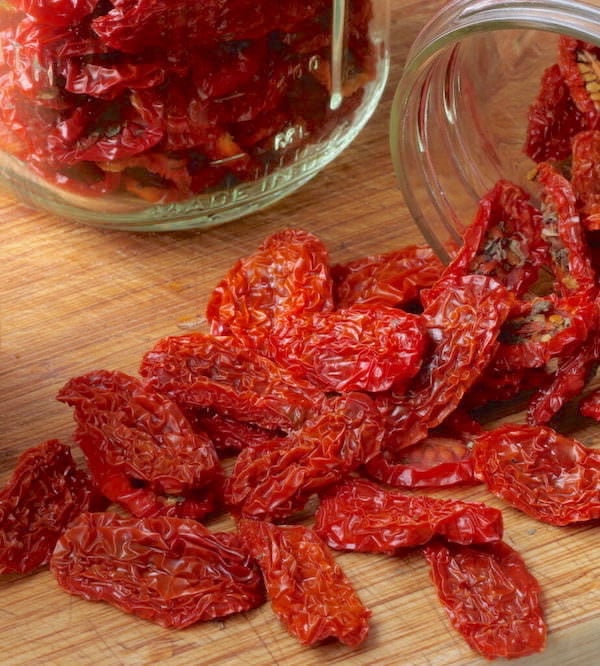
If you’re like me, you only eat fresh grape and cherry tomatoes when they’re in-season, vine ripened, and just picked. Compare the bright flavor of summertime tomatoes to the anemic taste of off-season hothouse tomatoes and there’s no contest! Want to preserve their incredible taste? Consider dehydrating them!
Dehydrating grape and cherry tomatoes creates an intense burst of flavor and color. If you grow your own garden I suggest planting extra grape tomatoes and/or cherries just for this purpose. If you don’t have your own bumper crop, see if a local farm or market will sell you them in quantity at a discount.
Dehydrating Grape and Cherry Tomatoes
“Moist-Dry” versus “Leathery-Dry”
I prefer dehydrating grape and cherry tomatoes until they are almost dry; I store these moist gems in the freezer. Dry completely if you prefer to store them in your pantry, otherwise they’ll grow mold.
Drying Tomatoes in a Dehydrator
Method Overview
Wash grape or cherry tomatoes Cut them in half Arrange on trays Dehydrate between 125ºF – 135ºF Check and rotate trays periodically
Wash the tomatoes and drain well.
Slice each tomato in half lengthwise.
Arrange the halved tomatoes on your dehydrator trays with the skins facing down. This will prevent the juices from dripping. Leave a bit of space between each tomato so they are not touching. Sprinkle with oregano and sea salt if desired.
Put the trays in your dehydrator and turn it on. If it has a thermostat, set it between 125º to 135º.
It will take 10 to 12 hours for the tomatoes to become “moist dry” and will take 12 to 14 hours to become “leathery dry.” These are approximate times. Periodically check the tomatoes for doneness, and rotate the trays. Even if your dehydrator has a fan, rotating the trays will help them become more evenly dried.
Once dried to your preference, let the tomatoes cool down. Place them in an airtight glass jar with a screw lid; label with the date.
Leave the jar at room temperature for 24 hours so the moisture content of the tomatoes will become more evenly distributed. This process is called “conditioning”.
Store moist-dry tomatoes in the freezer. Store leathery-dry tomatoes in a cool, dark, dry location.
Hard to eat just one so resist if you can!
FAQs
How long does it take to dehydrate grape and cherry tomatoes? In general, it takes somewhere between 10 to 14 hours for halved grape and cherry tomatoes to dehydrate. The actual time will depend on several factors, such as: • temperature of the dehydrator • humidity in the room • whether the dehydrator has a circulating fan or not to keep the heat evenly distributed • how often the dehydrator is opened, and if it opens from the top or side • size and moisture content of the tomatoes • whether you are drying until moist-dry or leathery-dry
How to use dried tomatoes? • We enjoy eating moist-dried tomatoes right out of the jar for a burst-of-tomato snack. We also add them to various salads, wraps, stuffings, and more. Many Italian recipes call for sautéing garlic in olive oil. Consider slicing moist-dried tomatoes into ribbons, then adding them to the pan during that step. They are especially delicious in hot or cold pasta dishes that call for a pesto or olive oil dressing. Even just a bit of these gems adds a welcome bursts of flavor – there’s no need to overdo it. • Soak leathery-dried tomatoes in a small amount of warm water until they are softened. Once they’re softened, slice into ribbons (or use as is) in various dishes as described above. You can add the tomato infused soaking water to your dish too.
How long do dehydrated tomatoes last? Technically, if kept in an airtight container, moist-dry tomatoes will last indefinitely in the freezer and leathery-dry tomatoes will last indefinitely in a dark, dry, cool location. The longer they are stored; however, the more nutrients will be lost. So try to use them within a year.
How to make tomato powder and what is it used for?
If you have a grinder or a high speed blender, tomato powder can be made from leathery-dried tomatoes following these three easy steps.
Freeze leathery-dried tomatoes before grinding or blending them into powder. Transfer them to your grinder or high-speed blender and immediately process using the highest speed. Blend while the tomatoes are still frozen for best results. They thaw fast, so work quickly. Put the powder into a glass jar with a tight fitting lid and store in a dark, dry, cool location. As you can imagine, tomato powder packs a tomato punch. It can be added to soups, sprinkled on anemic tomatoes (to boost their flavor), sauces, and more.
You can also use this powder to make tomato paste. Simply combine two parts powder to one part water and voila, you have tomato paste!
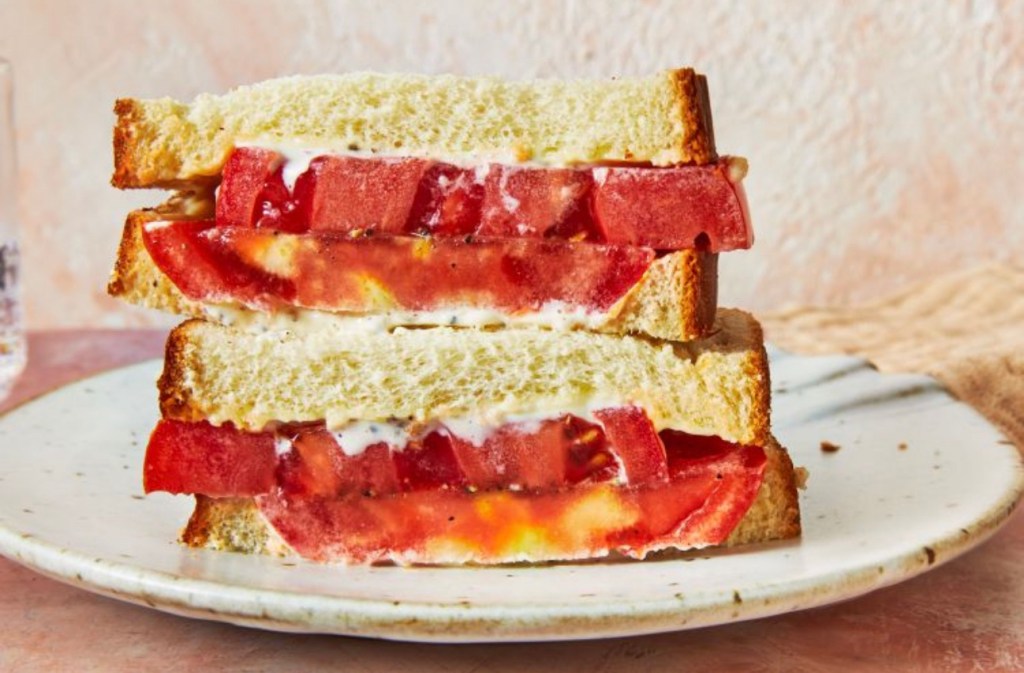
When garden tomatoes are at their juiciest, this classic eat-it-over-the-sink sandwich—with its mayo-gilded drips—is a must.
★★★★★
Sandwich, TRIED & TRUE
Prep Time: 5 mins Cook Time: 5 mins Servings: 1 Source: southernliving.com
INGREDIENTS
2 (1/2-inch-thick) slices beefsteak tomato
1/4 tsp. kosher salt or 1/8 tsp. table salt
1/4 tsp. freshly, coarsely ground black pepper
2 slices white sandwich bread
3 Tbsp. mayonnaise (homemade or Dukes)
DIRECTIONS
Prepare tomato slices:
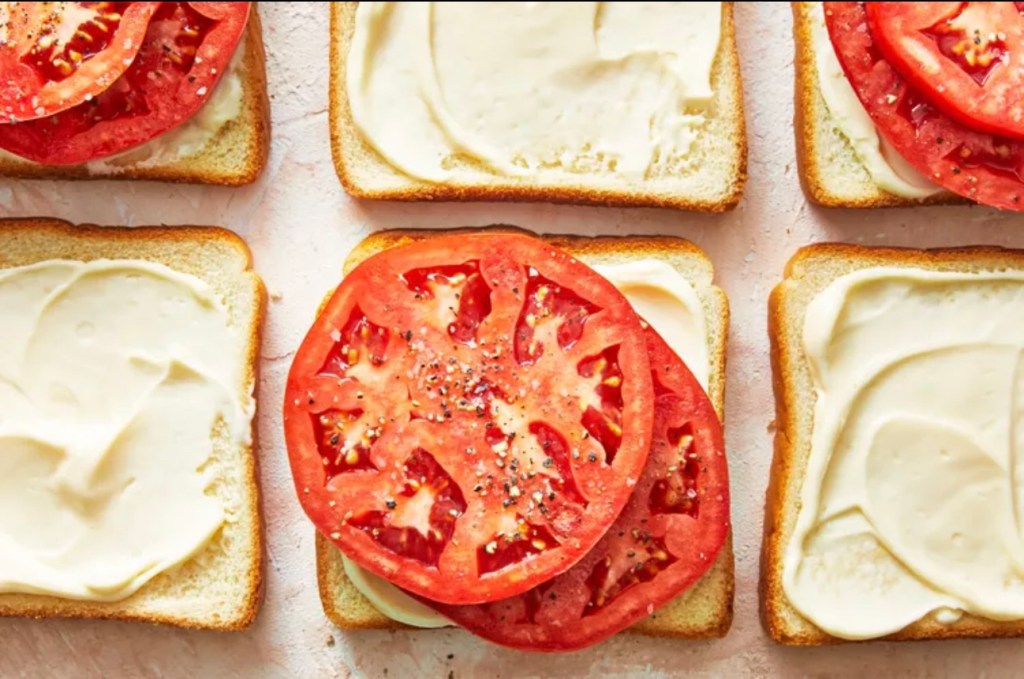
Arrange tomato slices on a paper towel; sprinkle evenly with salt and pepper. Let stand until tops of slices are beaded up with juices, 3 to 5 minutes.
Spread one side of each bread slice with 1 1/2 tablespoons mayonnaise.
Arrange tomato slices on mayo side of one bread slice; top with other bread slice, mayo slice down. Enjoy immediately.
It’s probably safe to say that most Southerners with tomatoes in their garden (or with generous friends who grow tomatoes) mark the official beginning of summer with their first tomato sandwich. It’s a delicious kickoff to a season of produce goodness, a ritual enjoyed often and with great enthusiasm while tomatoes are at their peak. It’s one of the simplest sandwiches you can make, and to enjoy a true taste of summer in the South, you really do need to keep it simple.
Of course, there are embellishments you can add if you want (more about that later), but the basic formula of soft white bread, mayonnaise, tomatoes, salt, and pepper produces a Southern ideal. The bread soaks up the yummy tomato juices, which mingle with the creamy mayo, but it doesn’t get soggy because you eat this yumminess right away, and quickly. The tomato sandwich is so irresistible, you might just gobble down two in a row. It’s shockingly easy to do.
What Kind of Tomato Is Best for a Tomato Sandwich?
The most important thing for a good tomato sandwich is that you start with a fresh beefsteak tomato from the garden or the farmers’ market. You’re not going to get the same sort of intense joy from a grocery store tomato, which typically lacks the same level of juiciness, sweetness, and flavor complexity.
Beefsteak tomatoes are the big guys, the ones you might sometimes call slicer tomatoes; a slice of this kind of tomato should cover a piece of sandwich bread or a hamburger bun. You can go with heirloom or conventional tomatoes; either type will be delicious.
What Kind of Bread Is Best for a Tomato Sandwich?
Soft white bread is what you want here. Baguettes and artisanal boules are beautiful loaves, and whole-grain bread is downright delicious, but they’re not right for this a tomato sandwich. Squishy white bread from the bread aisle, not the bakery section, is the right choice. The softness marries perfectly with the juicy-meaty texture of the tomatoes, so preferably leave the bread untoasted.
Note that some white sandwich bread is very sweet (from lots of added sugar), so for the best flavor—bread that truly complements the tomatoes—look for brands such as Sara Lee, which contains just two grams of added sugar per serving.
What Is the Best Mayonnaise for a Tomato Sandwich?
If you really want to go for the most luxe, top-notch experience, try making your own homemade Mayo. (It’s easier than you think, and it tastes fantastic.) Short of that, Duke’s gets the gold star for its supreme creaminess and balanced flavor with a hint of tang and loads of savory richness.
Our Top Tip for the Best Southern Tomato Sandwich
With something this simple, quality ingredients are of course key. We’ve already discussed those crucial garden tomatoes, the best bread, and the right mayo. To make all of those elements come together in perfect harmony, you need to season the tomatoes to enhance their flavor and juiciness.
We recommend placing the slices on a paper towel, sprinkling with generous amounts of kosher salt and coarsely ground black pepper, and letting them hang out for 3 to 5 minutes. Some of the juices will soak into the paper towel, but don’t worry—there will still be plenty to run down to your elbow as you take a bite. That brief hang time allows the seasonings to permeate the tomato (making it taste like tomato to the 10th degree) and really gets the juices going.
Possible Embellishments for a Tomato Sandwich
Trust us: The simple tomato sandwich recipe below is a thing of beauty, the sandwich you’ll crave all your life.
If you want a little more oomph, however, you can try adding some very thinly sliced Vidalia onion for crunch and additional savory notes. You can even soak that shaved onion in cider vinegar for a minute for a puckery pickled onion effect. Or chop some basil and stir it into your mayo for an herbal punch.
In place of kosher salt, you could try smoked salt, seasoned salt, or garlic salt, and you could replace the black pepper with crushed red pepper flakes.