Caprese Chicken Skillet

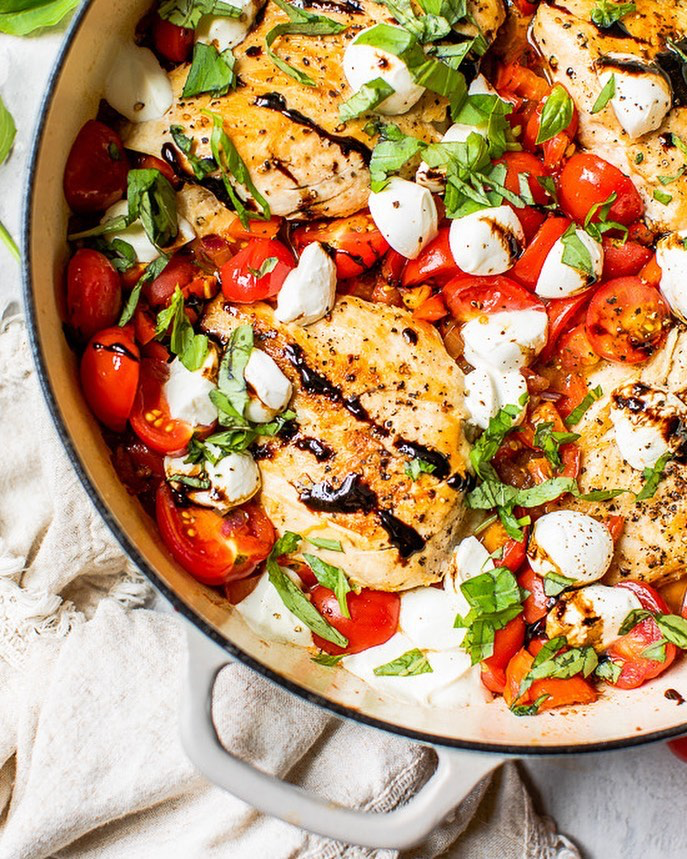
A great way to use up your summer tomatoes 🍅

Caprese Chicken Skillet

INGREDIENTS

1/2 cup plus 1 tablespoon balsamic vinegar, divided

1 tablespoon plus 1 teaspoon honey, divided

4 small boneless, skinless chicken breasts (24 oz)

 teaspoons kosher salt, divided

½ teaspoon ground black pepper, divided

2 tablespoons extra virgin olive oil, divided

1 small red onion, diced (about 1 cup)

4 cloves garlic, minced (about 4 teaspoons)

4 cups sliced tomatoes: halved cherry or grape tomatoes, (2 pints) or ½- inch- diced peak season plum or other garden tomatoes

¼ teaspoon dried thyme

4 ounces part- skim mozzarella pearls, (scant 1 cup) or 4 ounces block- style part- skim mozzarella cheese cut into bite-sized cubes

¼ cup tightly packed fresh basil leaves, thinly sliced

DIRECTIONS

In a small saucepan, combine ½ cup of the balsamic vinegar and 1 tablespoon of the honey. Gently simmer over medium- low heat, stirring occasionally, until thickened and reduced by a little more than half, about 15 minutes.

Remove from the heat and set aside.

While the balsamic reduces, arrange the chicken on a cutting board and stretch a large sheet of plastic wrap over the top. Lightly pound the chicken breasts into an even ½- inch thickness. Discard the plastic, then sprinkle the chicken with ¾ teaspoon of the salt and ¼ teaspoon of the pepper, seasoning both sides.

In a large, heavy- bottomed skillet, heat 1 tablespoon of the oil over medium- high heat. Once the oil is hot but not smoking, add the chicken breasts top- sides down, being careful of oil that may splatter. Let cook undisturbed for 4 minutes, or until lightly browned.

Flip and cook an additional 3 minutes. Check for doneness. The chicken should reach 165 degrees F at the thickest part when tested with an instant- read thermometer, and when sliced, the juices should run clear.

If it needs additional time, flip again and continue cooking for a few minutes on each side, until done. The total cooking time will vary depending upon the size of your chicken. Remove to a plate and cover to keep warm.

Without wiping out the pan, reduce the skillet heat to medium. Add the remaining tablespoon of oil, swirl to coat the pan, then add the red onion and let cook until slightly softened, about 3 minutes, scraping the browned bits off the bottom of the pan as it cooks.

Add the garlic and let cook 30 seconds, just until fragrant.

Add the tomatoes, thyme, and remaining 1 tablespoon balsamic vinegar, 1 teaspoon honey, ½ teaspoon salt, and ¼ teaspoon pepper. Increase the heat back to medium high and cook until the tomatoes begin to soften, about 2 minutes.

Return the chicken to the pan, nestling it into the tomatoes, and scatter the mozzarella throughout.

Cover the pan and remove from the heat. Let stand for 1 to 2 minutes to allow the mozzarella to become soft and melty.

Uncover, drizzle the balsamic reduction over the top, and sprinkle with the fresh basil. Serve warm.

NUTRITION

Serving: 1piece chicken, 1/4 veggies and cheese, Calories: 419kcal, Carbohydrates: 21g, Protein: 47.5g, Fat: 16.5g, Saturated Fat: 5g, Cholesterol: 141mg, Sodium: 585mg, Fiber: 2g, Sugar: 7g Blue Smart Points: 7 Green Smart Points: 10 Purple Smart Points: 7

Tomatillo Salsa Verde

Tomatillo Salsa Verde

Tomatillo Salsa Verde

★★★★★

Mexican, Sauce, TO TRY

INGREDIENTS

1 1/2 lb tomatillos

1/2 cup chopped white onion

2 cloves (or more) garlic (optional)

1/2 cup cilantro leaves

1 Tbsp fresh lime juice

2 Jalapeño peppers OR 2 serrano peppers, stemmed, seeded and chopped (you can use whole for more heat if you want)

Salt to taste

DIRECTIONS

1 Remove papery husks from tomatillos and rinse well.

2a Oven Roasting Method Cut the tomatillos in half and place cut side down on a foil-lined baking sheet. Add a few garlic cloves in their skin (if using) Place under a broiler for about 5-7 minutes to lightly blacken the skins of the tomatillos.

2b Pan Roasting Method Coat the bottom of a skillet with a little vegetable oil. Heat on high heat. Place the tomatillos in the pan and sear on one side, then flip over and brown on the other side. Remove from heat.

2c Boiling Method Place tomatillos in a saucepan, cover with water. Bring to a boil and simmer for 5 minutes. Remove tomatillos with a slotted spoon.

3 Pulse in blender: Place the cooked tomatillos, lime juice, onions, garlic (if using), cilantro, chili peppers in a blender or food processor and pulse until all ingredients are finely chopped and mixed.

4 Season to taste with salt. Cool in refrigerator.

Serve with chips or as a salsa accompaniment to Mexican dishes.

InstaPot Roast

Made this two nights ago and we ate EVERY bit of it as leftovers. That almost never happens.

InstaPot Roast

InstaPot Roast

★★★★★

Main Dish, Meats

INGREDIENTS

2-4 lb cross rib, chuck or blade beef roast

1-2 tbsp olive or canola oil

1 1/2 cup onion in 1” dice

4 cloves garlic, minced

2 stalks celery, sliced

2 cups beef/chicken broth (or water)

(1-2 tbsp Beef Better than Bouillon – optional)

2-4 tbsp tomato paste (optional)

2 tbsp soy sauce

2 tbsp Worcester sauce

1 1/2 tbsp regular or balsamic vinegar

1/2 tsp basil

1/4 tsp thyme

2 bay leaves

1 tbsp brown sugar

1 tsp salt

1/2 tsp pepper

3 cups potato chunks (about 1 1/2” pieces)

4 – 6 carrots, in 3” pieces

3 tbsp flour

1/2 cup water

DIRECTIONS

Pat the roast dry with paper towel and generously season with salt and pepper. Press Sauté on the Instant Pot and when the display says HOT, add the oil. Put the roast in and brown it well without moving it for 3 or 4 minutes. Then flip it and do the same on the other side. If you want, you can brown the sides, too. Browning it will produce a rich, beefy flavor. Then transfer it to a plate.

Add the onions and mushrooms and stir for a couple minutes. Add the garlic and press Cancel. Stir in the garlic as the pot cools down. Add celery and the broth (or water) and stir to deglaze the pan, scraping all brown bits off the bottom. Be sure to get ALL the bits up or you could end up with the “Burn” warning and your IP will shut off.

Add the tomato paste, if using, soy sauce, Worcestershire sauce, vinegar, basil, thyme, bay leaves, brown sugar and salt and pepper.

Put the roast and any juices back in the pot. Close the lid and make sure the valve on the top is set to SEALING. Press Pressure Cook (or Manual) and sue the +/- buttons to get it to 50 minutes. Then, just walk away.

When it beeps that it’s done, leave it for 15-20 minutes natural release. Then flip the valve from Sealing to Venting and when the pin drops, open the pot and take a whiff, Delicious, right?

Remove the roast and cover it with foil. Throw away the bay leaves. Put the potato chunks and carrots in the pot and give them a stir. Close the lid and set the valve to Sealing. Press Pressure Cook (or Manual) and adjust the time to 5 minutes. While it’s cooking, mix the flour and water until completely smooth or shake it in a jar.

When it beeps that it’s done, press Cancel and flip the valve to Venting for quick release. When the pin drops, remove the lid.

Scoop out the vegetables in to a bowl and hit the Sauté button again. When it comes to a boil, add about half the flour/water slurry and stir to thicken. If you like it thicker, add more but keep in mind it will thicken as it cools.

Taste and adjust seasoning with salt and pepper and You. Are. Done.

*Garnish with fresh parsley if desired.

It’s PEACH season 🍑

Even though I live part-time in Georgia, I ALWAYS order peaches from Dickey Farms. For a few short weeks each year, they ship perfectly ripe DELICIOUS soft ball size peaches, to your door.

My FIRST recipe each year for peaches used to be cobbler, but this pie 🥧 recipe came along from the Peach Truck Cookbook.

You may have better luck than I did using the Peach Truck’s delivery service. It was the one year Dickey’s wasn’t shipping due to the season being so short. I was very disappointed by the condition of the peaches. Very bruised, which of course ruins the peach’s taste and texture.

So although I cannot recommend The Peach Truck’s shipping, I HIGHLY recommend their cookbook. Every recipe I’ve tried has been a winner!

Peach 🍑 Pie with Southern Baked Pies, pie server

Peach Pie

★★★★★

Desserts, Fresh Fruit, Fruit, Pie

INGREDIENTS

Millie’s CRUST:

3 cups all- purpose flour, plus more for dusting

1 tbsp sugar

1/2 tsp salt

1 1/4 cups cubed cold vegetable shortening

5 tbsp ice water

1 tbsp apple cider vinegar

1 large egg

FILLING:

4 pounds fresh peaches, pitted and sliced (about 12 cups)

1/2 cup plus 1 tbsp sugar

1/4 cup cornstarch 

pinch of kosher salt

2 tbsp fresh lemon juice

1 tsp vanilla bean paste or pure vanilla extract

1 large egg

DESCRIPTION

Peach Pie adapted from the Peach Truck Cookbook

DIRECTIONS

1. To make the crust, sift together the flour, sugar, and salt into a medium bowl. Cut in the shortening with a pastry blender until the mixture resembles large peas. Whisk together the ice water, vinegar, and egg in a small bowl. Add the egg mixture to the flour mixture and stir with a fork until just combined. Divide the dough in half; flatten each half into a disk and wrap in plastic wrap. Chill for 2 hours or overnight.

2. Preheat oven to 425 degrees. Line a baking sheet with parchment paper.

3. Roll out one dough disk on a lightly floured surface to a round about 1/4 inch thick. Fit the dough into a 9-inch pie plate. Roll out the other dough disk to a round about 1/4 inch thick. Place the round of dough on the prepared baking sheet. Cut into 2 1/2 inch wide strips. Chill the dough while preparing the filling.

4. To make the filling, combine the peaches, the 1/2 cup sugar, the cornstarch , salt, lemon juice, and vanilla in large bowl.

5. Spoon the filling into the dough-lined plate. Arrange the pastry strips on the top of the pie in a lattice. Fold the edges under and crimp. Beat the egg and the 1 tbsp water together in a small bowl. Brush the egg lightly over the top crust.
Sprinkle with the 1 tbsp sugar.

6. Line a baking sheet with aluminum foil and place on the bottom rack of the oven (this is to catch any filling that bubbles over). Bake the pie on the center rack for 15 minutes.
Reduce the oven temperature to 375 degrees and bake 40 to 50 minutes more, until golden brown and bubbling, shielding the pie with a sheet of foil after 20 minutes if the crust is getting too brown. Let cool completely on a wire rack, about 2 hours, before slicing and serving.

Lattice placed and ready to brush with the egg wash
Let cool 2 hours and serve

The Peach Truck Cookbook: 100 Delicious Recipes for All Things Peach https://www.amazon.com/dp/1501192671/ref=cm_sw_r_cp_api_i_L7dlFb14QG2JP

Sourdough and Peach Grilled Cheese Sandwich

A Peachy take on your Classic Grilled Cheese sandwich

Peach and Muenster on sourdough 🙌🏻
if grilled cheese is served in heaven …

The Grilled Cheeserie’s Shaved Peach Melt

★★★★★

Quick & Easy, Sandwich

INGREDIENTS

2 teaspoons pickled mustard seeds or whole grain mustard

1 teaspoon honey

3 slices English Farmstead Buttercup Cheese (2.5 ounces)

1/2 small peach, pitted and very thinly sliced (about 1/3 cup)

4 or 5 fresh basil leaves, torn

2 (1/2-inch-thick) slices bakery style bread

I Tablespoon salted butter

DIRECTIONS

1). Combine the mustard seeds and honey in a small bowl. Arrange the cheese slices, peach slices, and basil on one slice of the bread. Drizzle with the mustard mixture. Top with remaining bread slice.

2). Melt the butter in a medium skillet over medium heat. Add the sandwich; cook for 2 minutes on each side, or until the bread is golden and toasted and the cheese has melted.
Serve immediately.

The Grilled Cheeserie started as a food truck shortly before the Peach Truck.
This melt is incredible with Buttercup cheese, a small-batch variety made in North Carolina, which Peach Truck gets from the Bloomy Rind in Nashville. If you can’t find Buttercup, use Muenster, or another cheese that melts easily.

This lighter version of Macaroni Salad with tomatoes and black olives is the perfect side dish for any summer BBQ.

Macaroni Salad with Tomatoes

Macaroni Salad with Tomatoes

Make Ahead, Pasta, Pasta, Salads, TO TRY

INGREDIENTS

6 oz uncooked elbows, wheat or gluten-free

2 medium tomatoes, diced

1/4 red onion, finely chopped

1/4 cup Hellmann’s light mayonnaise

1 tbsp white vinegar

dash garlic powder

1 tsp oregano

2.5 oz sliced black olives

salt and pepper

DIRECTIONS

Cook pasta in salted water according to package directions.

Drain and rinse under cold water.

In a medium bowl, combine mayonnaise, vinegar, tomatoes (and any juice from the tomato), olives, onion, garlic powder, oregano salt and pepper. Mix well.

Add elbows and mix well.

NUTRITION

Serving: 3/4 cup, Calories: 125kcal, Carbohydrates: 21.5g, Protein: 3.5g, Fat: 3.5g, Saturated Fat: 0.5g, Cholesterol: 2.5mg, Sodium: 165.5mg, Fiber: 1.5g, Sugar: 0.5g Blue Smart Points: 4 Green Smart Points: 4 Purple Smart Points: 4 Points +: 3

Pesto Zoodles

Don’t they look AH-mazing?!! Pesto is one of my FAVORITES about summer, and now there’s no guilt of the pasta 🍝.

Pesto Zoodles

INGREDIENTS

2 medium-large zucchini

2 cloves garlic

1/2 yellow onion or white onion

extra virgin olive oil or butter

salt and pepper, to taste

pesto sauce (or other pasta-like sauce of choice, if any)

2 each small tomatoes (optional)

1/4 tsp garlic powder (optional)

1 tsp onion powder (optional)

DIRECTIONS

Wash your zucchini, and then use spiralizer* to create zucchini noodles. *See notes below

Add a small amount of olive oil or butter to a saute pan or skillet over medium-high heat.

Next, if using garlic and onions, add them to the pan and cook until the onions are translucent.

Now add the zoodles and gently toss them every minute or so throughout the cooking process which should only be about 5 minutes. Do not cover the pan while cooking – that will make them extra wet. Allowing steam to be released is good.

Once finished cooking, plate the zoodles and sauce or top them anyway you see fit and enjoy immediately. There will be a bit of excess liquid in the pan. If you do not wish to have all the liquid in your dish, you can either strain your zoodles or use tongs to plate them – leaving much of the liquid behind. We like to serve our zoodles with a few dollops of pesto and chopped fresh tomatoes.

Pesto Zucchini Noodles by Homesteadandchill.com

Insta Pot Chicken Pho 🍲

It’s not 17DD compatible with the noodles , but the broth is amazing

Instant Pot Chicken Pho

Healthy, INSTAPOT/Pressure Cooking, Soups & Stews, TO TRY

INGREDIENTS

2 small yellow onions (11 oz. total), halved crosswise

1 (3-in.) piece fresh ginger, unpeeled, sliced, and smashed (about ⅓ cup)

2 teaspoon coriander seeds

4 whole cloves

3 whole star anise

8 (5-oz.) bone-in, skin-on chicken thighs

2 quarts lower-sodium chicken broth

 cup fish sauce

2 tablespoons dark brown sugar

1 (8-oz.) pkg. uncooked rice vermicelli noodles (such as Annie Chun’s Maifun)

4 cups fresh bean sprouts (4 oz.)

2 cups loosely packed fresh cilantro leaves with tender stems (from 1 bunch)

2 medium-size serrano chiles, unseeded and thinly sliced (2 Tbsp. plus 2 tsp.)

Optional toppings: matchstick carrots, torn fresh mint and basil leaves, Sriracha chile sauce

8 lime wedges

DIRECTIONS

Select SAUTÉ setting on a 6-quart multi-function programmable pressure cooker (such as Instant Pot). Allow to preheat about 5 minutes. Place onion halves, cut side down, in cooker. Add ginger; cook, undisturbed, until onion is slightly charred on cut sides, about 10 minutes. Add coriander seeds, cloves, and star anise; cook, stirring constantly, until fragrant, about 1 minute. Add chicken, broth, fish sauce, and brown sugar.

Close and seal lid. Turn Pressure Release Valve to Sealing position. Select MANUAL/PRESSURE COOK setting. Set to HIGH PRESSURE for 15 minutes. (It will take 15 to 20 minutes for cooker to come up to pressure before cooking time begins.) Let pressure release naturally. (This will take about 10 minutes.) Carefully turn Pressure Release Valve to Venting position, and let steam fully escape. (This will take 1 to 2 minutes.) Carefully remove lid.

Transfer chicken to a large plate; let rest until cool enough to handle, about 10 minutes. Remove and discard skin and bones; shred meat.

While chicken cools, pour broth mixture in cooker through a fine mesh strainer into a heatproof bowl; discard solids. Return strained broth to cooker. Add noodles, stirring to submerge; let stand until softened, about 5 minutes.

Return shredded chicken to mixture in cooker. Ladle soup evenly into 8 bowls. Top evenly with bean sprouts, cilantro, chiles, and other desired toppings. Serve with lime wedges.

My 17 Day Diet • or how to lose the Covid weight in a HURRY •

I’ve got a physical in 17 Days and ironically I have JUST the diet for it. NO shakes OR gimmicks, just wholesome HEATHLY food.

It jumps starts your metabolism and you’ll find support groups for it all over the web.

I’ll start with just a list of the basics and add recipes as I go along.

Cycle 1 (first 17 Days): ACCELERATE As much Lean Proteins as desire:

Fish- canned tuna, salmon, tilapia

Poultry- chicken breasts, turkey breasts, ground turkey (lean), eggs (2 eggs= 1 serving/ 4 egg whites= 1 serving)

As much Cleansing Vegetables as desire:

artichokes, asparagus, bell peppers, broccoli, carrots, cabbage, cauliflower, celery, cucumbers, eggplant, garlic, green beans, lettuce, mushrooms, onions, parsley, scallions, spinach, tomatoes

2 servings Low Sugar Fruit (eaten before 2PM):

Apples, berries, grapefruit, oranges, peaches, pears, plums, prunes, red grapes

2 servings Probiotics:

Yogurt- any type including greek style, sugar free fruit flavored; plain; and low fat (6 oz. = one serving), Live Active Cottage Cheese (1/2C = 1 serving)

Condiments (in moderation – the more you use the less you’ll lose that day! I actually avoid altogether) :

Salsa, low carb marinara, lite soy sauce, low carb ketchup, fat free sour cream, low fat broth, Truvia, sugar free jams and jellies, Pam, fat free cheeses, fat free salad dressing, salt, pepper, vinegar, mustard, herbs and spices.

Here’s a link to my Chicken Tortilla Soup: https://wp.me/p6Ccms-7r

Roast Beef 🥩 Perfection👌🏻

I’ve always been intimidated by cooking large cuts of beef. Which is silly because we buy a side of it every year. I could never count on it coming out perfectly UNTIL I used this recipe.

It’s written for Eye of Round, but I used it tonight on a 4 pound Sirloin Tip. Just follow the equation for time + weight, for a perfectly juicy, slight pink on the inside, outcome.

Perfect EVERY time

Roast – High Temperature Eye-of-Round

★★★★★

Main Dish, Meats

INGREDIENTS

1 (3 pound) beef eye of round roast

salt and pepper to taste

DIRECTIONS

1. Preheat the oven to 500 degrees F (260 degrees C). 

2. Season the roast with salt and pepper and place in a roasting pan or baking dish. 

3. Do NOT cover or add water.

4. Place the roast in the preheated oven. 

5. Reduce the temperature to 475 degrees F (245 degrees C). 

6. Roast for 7 minutes per pound. 

7. Then turn off the oven and let the roast sit in the hot oven for 2 1/2 hours. Do NOT open oven door AT ALL during this time!

8. Remove the roast from the oven, the internal temperature should have reached at least 145 degrees F (65 degrees C). Carve into thin slices to serve.

NUTRITION

Calories 227 kcal 11%
Carbohydrates 0 g 0%
Cholesterol 71 mg 24%
Fat 12.6 g 19%
Fiber 0 g 0%
Protein 26.6 g 53%
Sodium 123 mg 5%